My Workspace
Theme: Both Sides Now – Joni Mitchell
Introduction
A few years ago I inherited the ground floor of one of our outbuildings from my Husband. He built a massive barn, to house his office and space for wood/metalworking.
We built a conservatory on the front of it, and I turned the space into a sewing room.
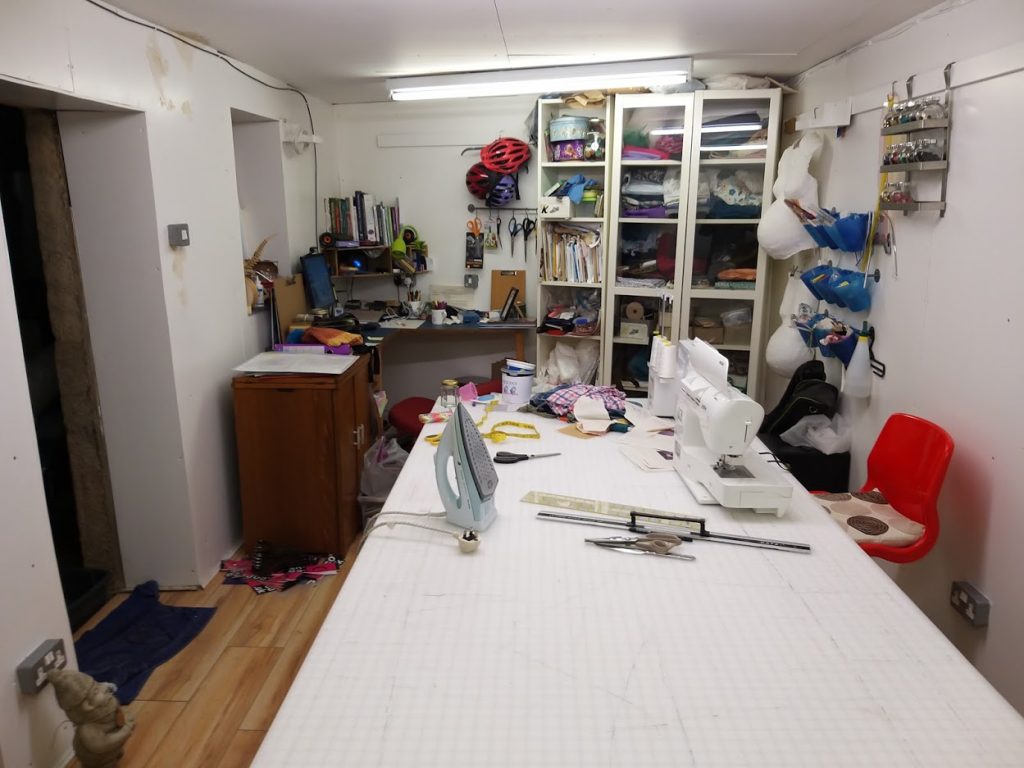
The space has been well used, but I’ve never really thought about where things should be in it.
The sewing room already had a worktop space built into the corner, so it was a no brainer that this should become my desk. My husband made sure I had an internet connection in the building, and suddenly I had a place to work.
Over the past year I have struggled to focus on the designs and spent less time in the office. I was procrastinating and found I was trying to work more in the house rather than in my work space.
After thinking about what this was happening, I realised it was because the space had become cluttered, a bit of a dumping ground and was generally not a place I wanted to be.
I needed this to change.
This is a design to improve my working environment.
Ethics
Earth Care – Use what I have, nothing bought. Give away or recycle things that are no longer needed, reducing waste going to landfill. Use humane mouse deterrent.
People Care – A tidy workspace helps a tidy mind. A place I want to be. A place I can share.
Fair Share – Give away things I don’t need any more to people who can use them rather than hoarding ‘stuff’. Enable other people to use the space with me.
Principles used to guide design
Holmgren’s Principles – as they seem more pertinent to non-land based projects.
Design Framework
GOBREDIM – Goal, Boundaries, Resources, Evaluation, Decisions, Implementation, Maintenance
The framework was chosen as it helped me focus on what I already had. It kept me on, task and ensured the boundaries of the design were clear.
Client
Myself – a personal project
Dates
January 2021
Tools Used
Base Map, Needs Analysis, Template Design, Create/Conserve/Use/Remove, Options & Decisions, Exclusions Analysis, Venn Diagram, PMI, Gannt Chart
Resources Used
Facebook. Freecycle, RHS encyclopaedia of plants & flowers, Permaculture Design by Aranya
Yields this project will provide
To identify what yields I wanted from this design, I asked myself the question “What do I need this project to be?” I didn’t use any tools, apart from a cuppa and a sit down in the space. I imagined what I wanted this space and this project to become.
- A nice space to work in that can be shared with my friends and family
- Organised work space
- Improved productivity and focus
- Practice using Permaculture on a non-land based project
Link to ALP & my personal objectives
As part of my ALP I identified that having a space to work and organise my thoughts was key to the success of my diploma, and also any professional work or research I need to carry out.
Goal
To have an inviting space to create and work
Observations
- The room is cluttered
- The room is dominated by the large cutting table
- The ceiling is stained with mouse urine
- Lighting is harsh, but functional
- The adjacent conservatory is under utilised, it is mainly a dumping space – filled with bikes and scooters, and also recently cut willow.
- The conservatory leaks
- One of my daughters had taken up sewing and needs to share the space
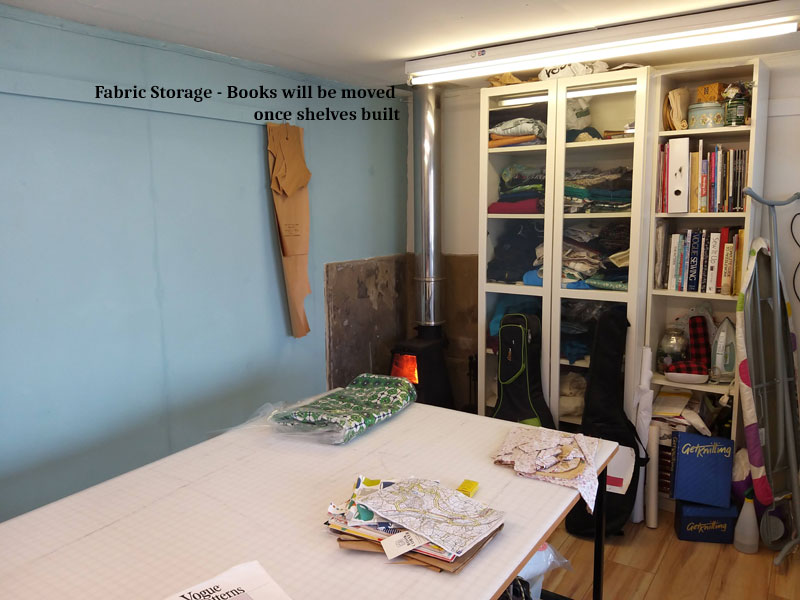
- I have fabric overload
- I inherited a lot of fabric and haberdashery. This has never been sorted.
- The room is built into the hillside. One wall shows evidence of damp.


Boundaries
- The sewing room only (the conservatory is the focus of another design)
- Financial – I have no spare cash for this project.
- Time – I need to have a workable space as soon as possible, so it needs to be useable as soon as possible.
Resources
I aim to use items that we have already if possible.
Large or Structural resources
- Structurally sound walls
- Picture rail on wall
- In-built desk, corner shelf & under desk shelf
- Wardrobe
- Shelf unit
- Vintage Sewing machine in cabinet
- Cutting Table – large
- A Wood burner
- A radiator
Accessories
- Metal rails
- Plastic pots
- Bobbin holder
- Hooks
- Dress Makers Dummies
Decoration
- Leftover paints
- Painting equipment
- Plant Pots
- Pictures & Posters
Technological
- Internet access
- Freecycle
- Pintrest
- A PC
- Lights
- Multiple Sockets
Skills
- DIY Skills
- Husband who is good at woodwork, tech & DIY
Evaluate
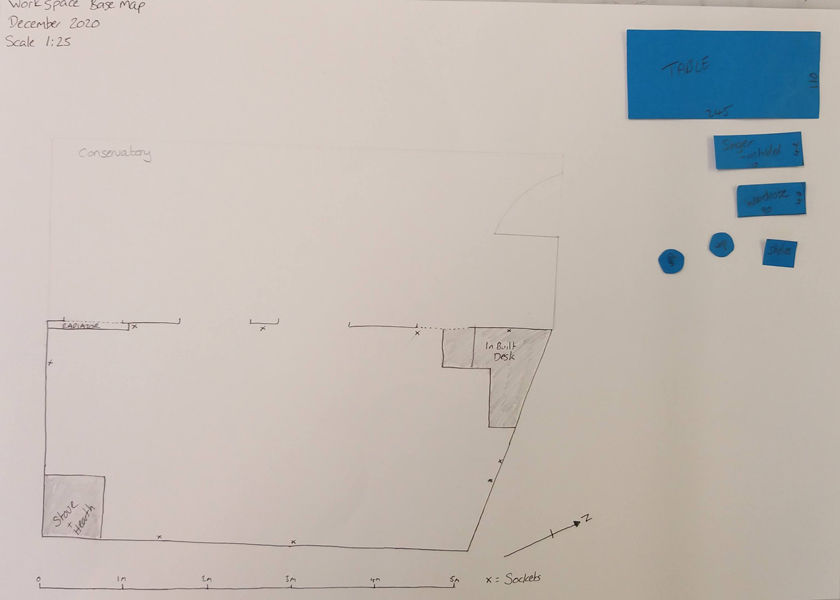
Base Map
Below is a plan of the work space. Items in blue on the right hand side are larger elements I will need to place in the design. A sewing table, the Treadle Singer sewing machine, a wardrobe, a shelf unit and 2 dressmaking dummies.
I know Maps are supposed to face North. I chose to display this map this way as it better reflects the space. i.e. The office space looking out to the conservatory.
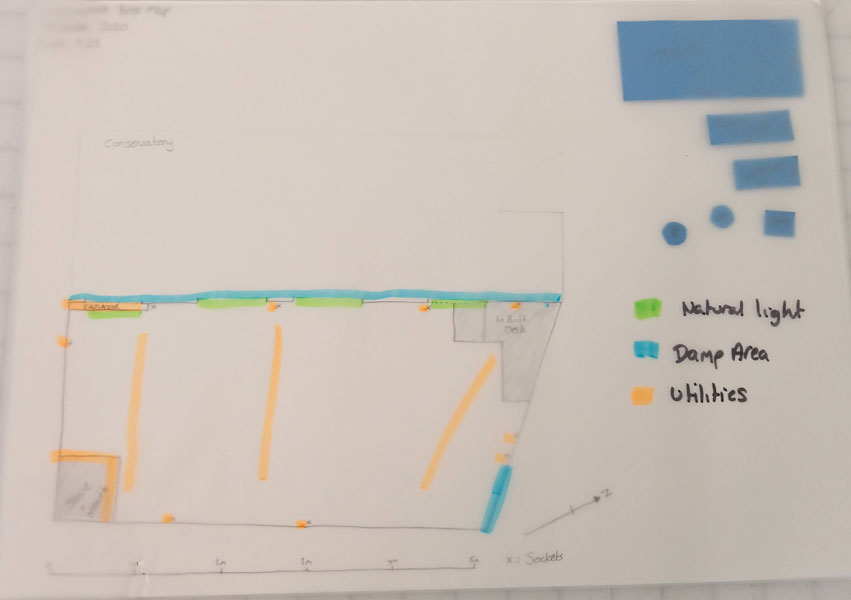
Exclusion Analysis
I identified areas that either needed to be kept clear to allow access, let light in or to avoid damage via damp or sun bleaching. These areas will restrict placement of elements.
Damp areas – Fabric needs to be kept dry. The wardrobe showed evidence of damp. The area it is currently located is under the area that receives the largest flow of water during heavy rain events. There are leaks where the conservatory joins the stone building. So far the builder hasn’t been able to see where water is coming in. In the meantime, I have a collection of pots and bowls that collect water. Keep things that need to be kept dry away from this area.
Utilities – access to electric sockets is needed by machines. Light switches need to be accessible. Radiator needs to be open. Flamamble items need to be kept away from stove. Strip lights lower the height of the ceiling.
Natural Light – keep windows free to maximise natural light. Reduces need to use strip lights during brighter days.
Sewing Table – It is huge.
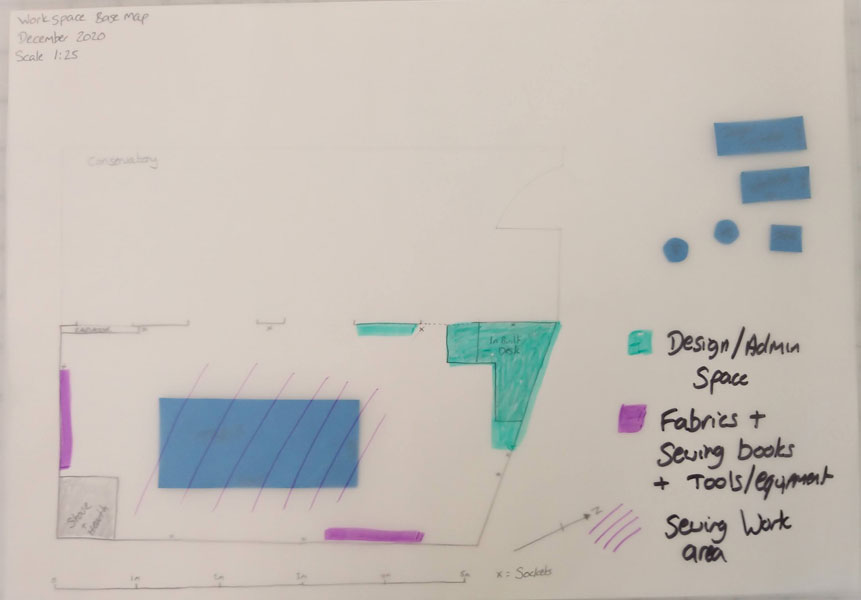
Zoning
The space has two distinct zones.
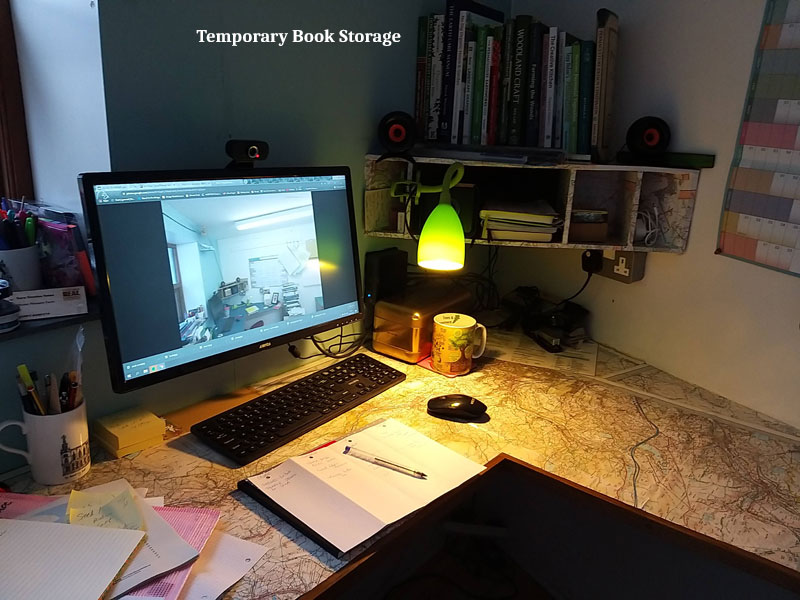
A design and admin space, I intend to keep all my design reference books, notebooks and relevant equipment close to the desk area. The desk also has good access top natural light and a great view out of the window.
The second zone is related to sewing. The fabric needs to be stored away from the damp areas. Sewing tools and equipment need to be easily on hand.
The sewing table provides a temporary storage area for useable scraps. This is until storage stools can be built.
NOTE – ADD ZONES as follows…
Zone 1 – Things I need to reach without moving
Zone 2 – Things I need to access regularly
Zone 3 – Things I need to access occasionally
Zone 4 – Things that I only use rarely
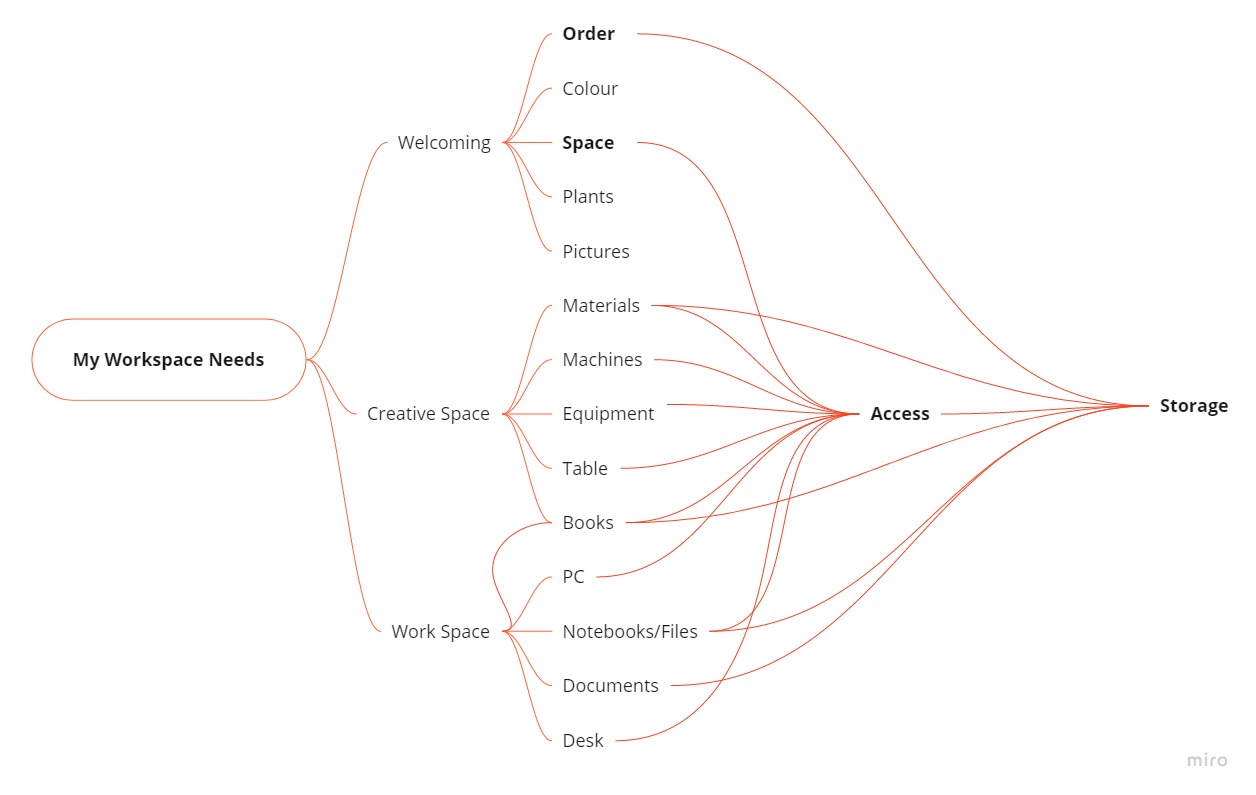
Needs/Wants Analysis
I carried out a wants and needs analysis of what I wanted for the space. I Needed a place to work, both on craft and sewing projects but also carry out design work, research and administrative work. The crux of the matter came down to needing to enable clear access to the tools and equipment I needed. I wanted to make the space inviting and inspire me.
How to make the space attractive?
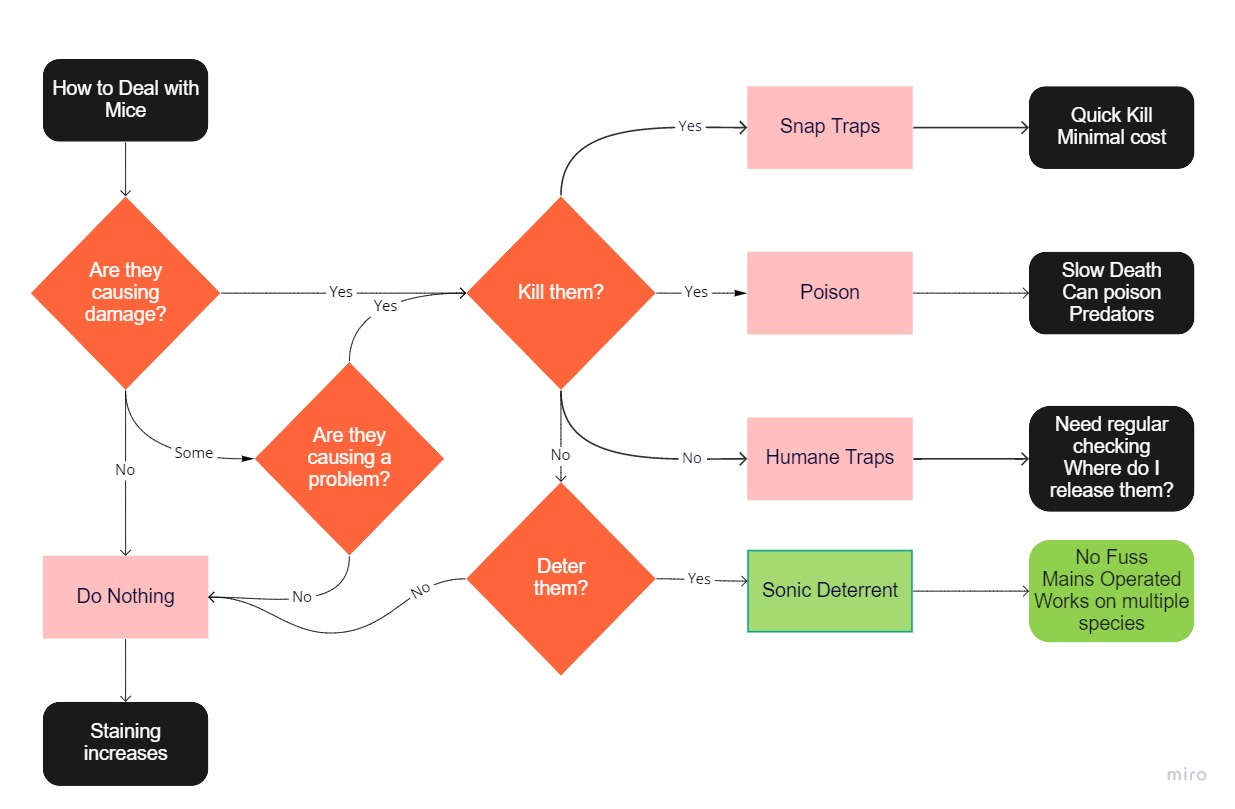
1. How to deal with the rodents?
Options & Decisions – How to deal with the mice
The mouse urine stains were becoming a problem, predominantly cosmetic, but they have been becoming more significant. Mouse droppings have also started to fall through cracks in ceiling onto work areas. This is probably not great hygienically.
I looked at a number or options and decided that a sonic deterrent would be the best option for now as I didn’t really want to kill them. We have plenty of other suitable places for the rodents to live!
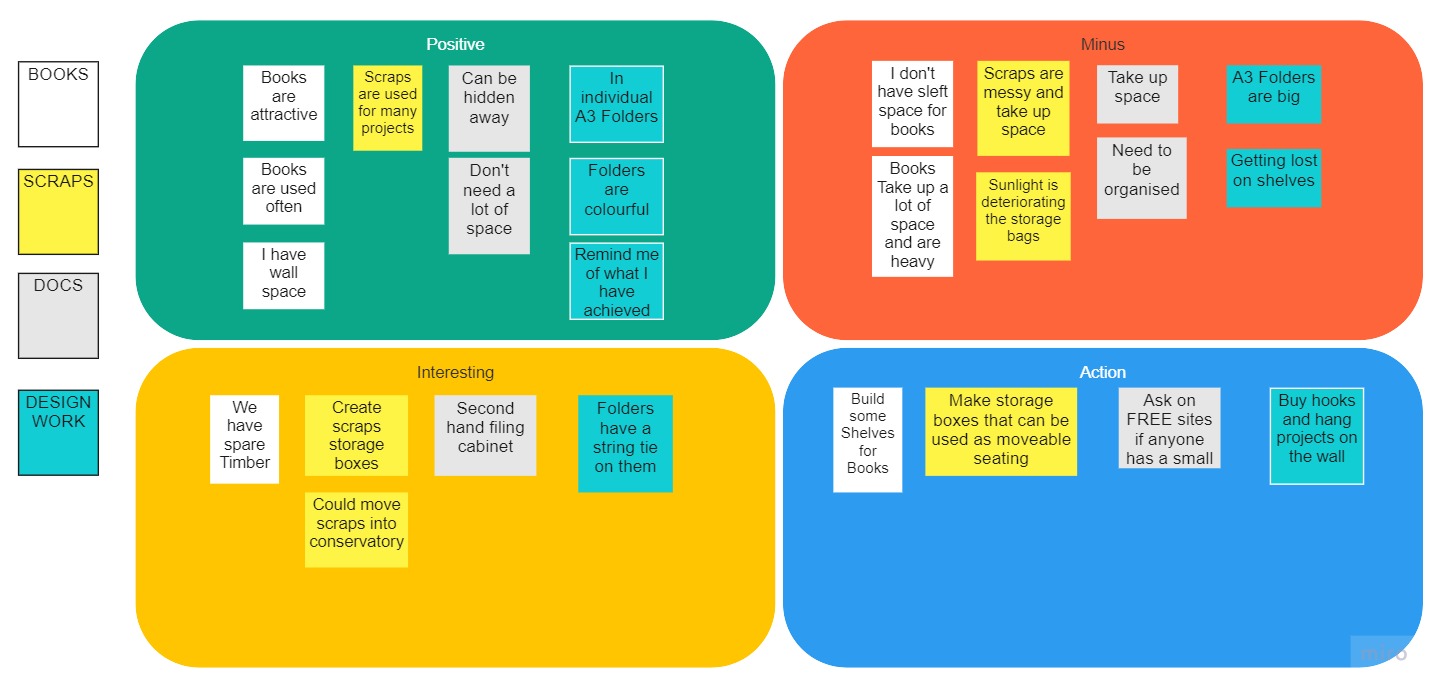
2. What storage do I need?
As keeping the space clutter free is and essential part of the design I analysed what storage space I had, and where things would be best kept for ease of access and appropriate storage. The ? element is where I don’t have anything appropriate in place at the moment, and perhaps a new storage solution is needed.
| Wardrobe | Shelf Unit | Walls | Under Desk Shelves | Above Desk Shelf | ? |
|---|---|---|---|---|---|
| Fabric | |||||
| Books | |||||
| Notebooks Large | Notebooks Small | ||||
| Scraps | |||||
| Paper | |||||
| Pens/ Tools | |||||
| Sewing Tools & Threads | |||||
| Design Work | |||||
| Craft Materials | |||||
| Haberdashery | Haberdashery | ||||
| Documents |
I carried out a PMI process for the four things that I currently don’t have a clear storage space for. I identified an achievable action for each element. These solutions will become elements in the design.
3. How do I make space?
Create/Conserve/Use/Remove
To make space, I needed a clear out. I carried out a Create/Conserve/Use/Remove analysis. This helped me sort out whether
- It was something I needed to create
- If the item could be conserved for use elsewhere
- If the item could be used in this design
- If the item needed to be removed.
| Create | Conserve | Use | Remove |
|---|---|---|---|
| Book shelves Storage Stools (for scraps) | Storage Bags Plastic Boxes Tins Fabrics I really like & will use Haberdashery I am likely to use | Wardrobe Shelf unit Desk Table Storage unit from Daughters room Wall rail Bobbin holder | Tat Unnecessary papers Unwanted fabric Unwanted haberdashery |
4. How do I add Colour?
I have different options when adding colour to the work space.
- Paint – Fast results, but involves time & physical labour. Over the years we have collected several tins of paint in various colours. Whilst rummaging I found several unopened tubes of decorators caulk. It was about 20 years old – but if still useable, will be perfect for filling the gaps between boards.
- Plants – Time & effort will be needed to look after the plants. Potentially need to create hangers. Cash needed to buy plants & materials. The plants need to survive both cold and heat; I only put the heating on in here when I am working. Because of the attached west facing conservatory, temperatures in summer can be very hot. The plants will need to survive without direct sunlight.
- Pictures – Fast results. Need to find pictures I like. Potentially these could be sources second hand or gifted. May need to be purchased. Create vision boards – add colour & inspiration
Decisions
How have principles guided my design?
| Catch & Store Energy | Making the most of the natural light. Use views to inspire my work space. Use plants to add colour Place current projects near desk Space to pin up vision boards |
| Obtain a Yield | A clear work space will help me to work more efficiently. Knowledge of houseplants Macrame skills Income from items sold |
| Apply Self Regulation and Accept Feedback | Each piece of fabric, each piece of paper, each book, each sewing pattern will be looked at. Be realistic. |
| Produce No Waste | Use things we already have. Offer unwanted items on local FREE sites. Use up old paint Use up scrap wood. |
| Use edges and value the marginal | Use the walls and ceiling Integrate conservatory and work space – moveable storage. Networks with other crafters and local artists built. |
I didn’t use all 12 Principles to guide the design, instead I selected a few that seemed most pertinent (perhaps I was also being a bit lazy). I do plan to evaluate the success of the design using the 12 principles as an evaluation tool.
Functions of the Design
| Function | Supporting Elements | Yield |
|---|---|---|
| To be welcoming | Colour Hanging Planters Storage Shelves Moveable storage seats | A place I am happy to be in A place to hang out with others House plant care knowledge Macrame skills |
| To inspire creativity | Books Vision Boards Design Work on show Project ideas on view | Motivation to create Clear view of next steps/jobs/projects Sense of achievement/progress |
| To access things I need easily | Wall storage Shelves | Space Momentum/flow |
| To be an organised space to work | Year planner Book shelves Tool storage | Tidy mind A sense of purpose Better productivity |
Location of Elements
I created templates of the larger elements to see how they could fit in the room. Blue items are existing, red items are those to be made.
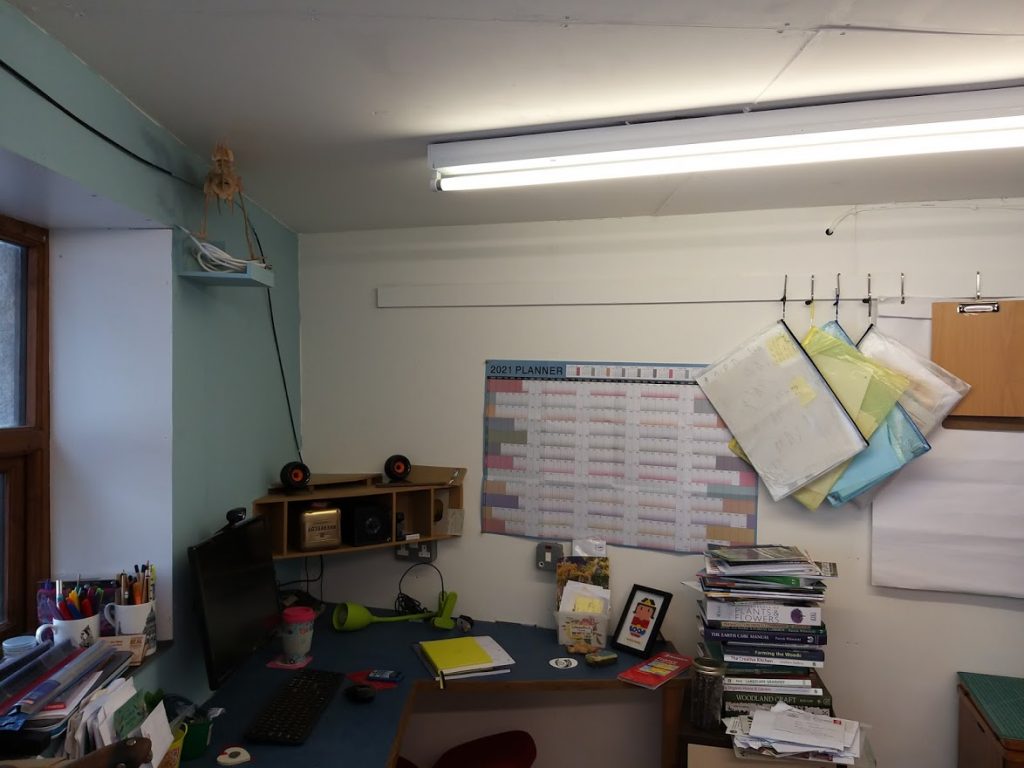
I will make use of the picture rail to display design work and also to store sewing tools.
The designs I am working on will hang near my desk. I also have space for an A1 Year planner, so I can more easily see deadlines and plan work on the farm. I have created space for a small filing cabinet.
Bookshelves will be on currently unused spaces and are out of direct light so covers won’t fade in the sun. They are within easy reach of my desk area and don’t interfere with movement in the room.
There is space to pin pictures and vision boards to help inspire me/keep me on track with projects.
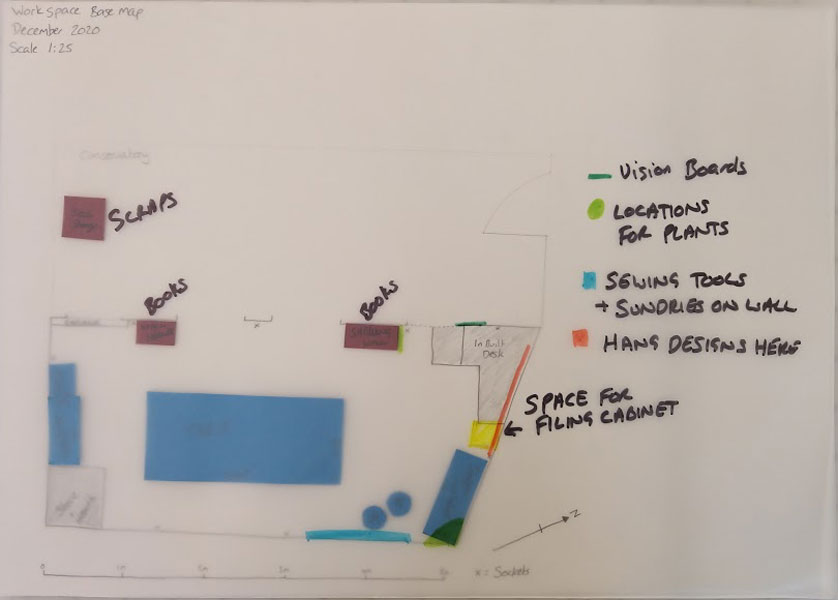
I want to use plants to add colour and life into the space. I don’t have shelf space for plants, but the ceiling is strong, so should be able to support hanging plants. But what sort of plants will survive here?
The plants need to survive both cold and heat; I only put the heating on in here when I am working. Because of the attached west facing conservatory, temperatures in summer can be very hot. The plants will need to survive without direct sunlight. The plants need to be suitable for hanging planters.

I like to learn new crafts. I have the materials to make macrame pot hangers. So I will be able to learn a new craft whilkst also creating the plant hangers needed to hold any plants.
But what about the Rodent problem?
I will use plug in sonic rodent repellers to see if that helps with the problem. Cracks in the ceiling will be sealed, so work spaces are no longer covered in droppings.
Storage
I will keep the existing shelves and wardrobe. Book shelves will be built using materials we have to hand. The shelves will have inbuilt book ends to ensure books don’t fall off the edges.
I will build wooden storage box seats. These will have padded tops and be on castors, so they can be easily moved, and also provide seating. The materials for the boxes will have to be purchased.
Implementation
The design needs to be implemented quickly – I set myself the deadline of the end of January for most of the work. I also aim to minimise the impact on the environment.
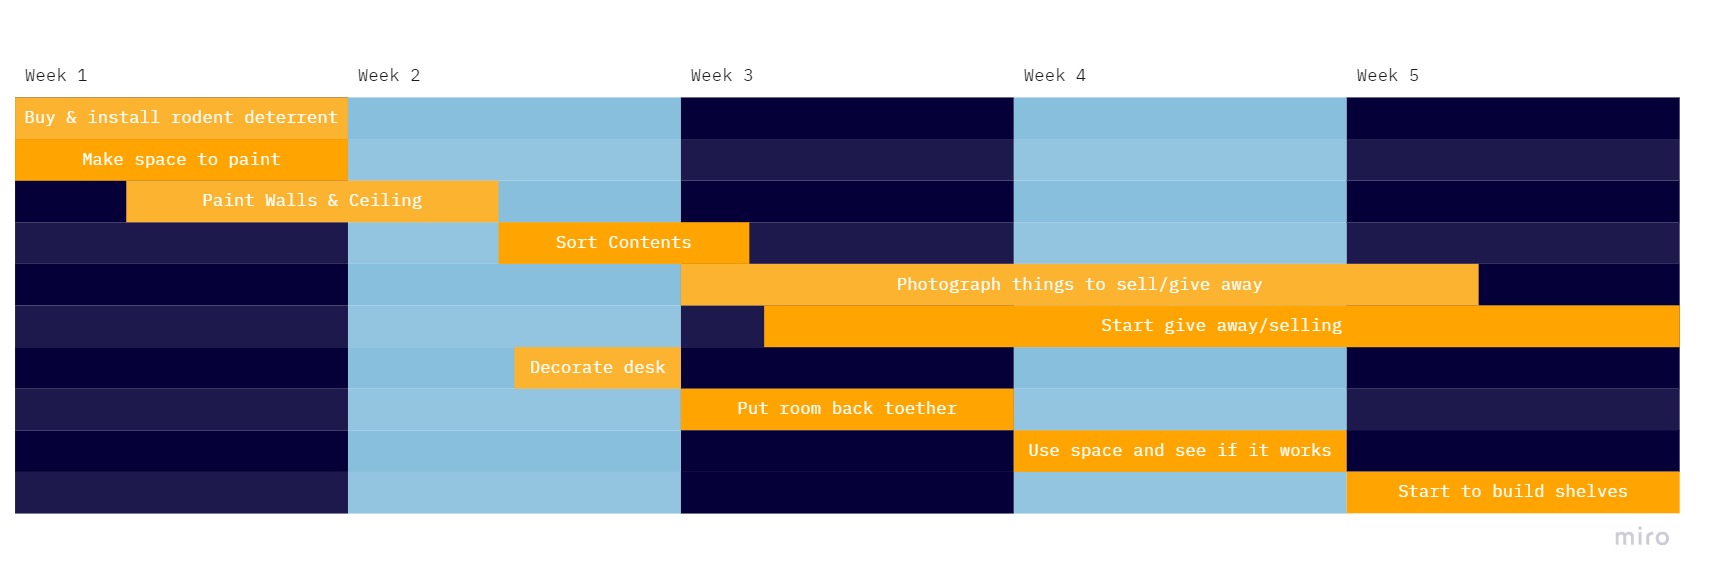
Week 1
Deal with the Mice
I decided to try some plug-in sonic deterrents to reduce the problems that the mice were causing. We have plenty of other habitats that these mice could occupy!
Make Space to decorate
I couldn’t empty the room, so this involved emptying cupboards, and storing everything under or on the central table. One side of the room was decorated at a time
Paint & Decorate
I found tins of white paint and some duck egg blue in our barn. This has brightened the space and added colour.
An old OS map has been repurposed and now covers the desk surface. This was attached using adhesives and varnish that we also had spare in the barn.
All furniture has been reused.
Week 2
Sort the contents
Sorting through the contents of the space is key to the design, inevitably from this process there were things I do longer needed or wanted. The big question is how best to dispose of these items.
Everything was considered and sorted into 5 categories:
Keep – things I need to keep or want to keep
Sell – things such as vintage sewing patterns that may have a small monetary value. This will fund my houseplant purchases. I set up an Etsy account for this.
Re-purpose – I shredded papers to use for bedding for the chickens. Some vintage tins have been emptied and reused.
Give Away – Much of the fabric will be offered for free on local gifting/lending sites so that others can make use of it.
Take to the recycling centre – items that cannot be rehomed due to poor condition or that really are beyond re-use will be taken to the local recycling centre. This will be a last resort.
Week 3
I took advantage of the empty room to photograph things I wanted to give away or sell.
I managed to find a FREE filing cabinet on a local Facebook site – so I could sort out my papers. Things I no longer needed were shredded & used as chicken bedding.
Week 4
I started to contact local craft groups to offer materials I was giving away. Any items not taken were then advertised on local Facebook ‘lend-a-hand’ sites.
Week 5
We will use wood offcuts from my husbands wood working projects to make the book shelves.
This step was delayed. My husband’s woodworking skills are better than mine, so I am currently waiting for him to have some free time to help me out.
The ‘almost’ finished room

Next Steps
Make the storage boxes – Winter 2021.
Following on from this design, my next step will be to sort out the conservatory area.
Maintenance
The big question is how do I plan to keep the space tidy?
I plan to
- Only buy/accept fabric that I need for a particular project
- File papers away as I read them, rather than sticking in a pile
- Set rules that if the space is used, it is tidied at the end of the day
- Turn unusable scraps into useable stuffing
- Keep the desk clear so it invites me to work
- Regularly look at and change the vision boards/inspirational pictures
Evaluation
Unexpected yields
I made connections with local artists and crafters, which will, in future enable us to better share skills, resources and knowledge.
I now have space to store a Bass amp and Bass, so I can start to fulfil my ambition to learn this instrument. I also have space to practice singing and my other instruments without annoying the rest of the family.
I set up an Etsy account. This has also given me a portal to sell craft items I make.
Did design successfully meet my original goals?
Yes. I have a space I am am happy to work in and my implementation schedule was mostly achieved.
| What Went Well | What Didn’t Go Well |
|---|---|
| I cleared and decorated the room within the timeframe | Once the room was useable I didn’t get round to building storage (YET). There is still some clutter |
| The room is useable and colourful | I haven’t put plants in yet, though I think they will be better in the conservatory area in hindsight. |
| I am happy in my workspace | The mice are still there – I have learned to live with the stained ceiling. |
| My daughter joins me and enjoys using the space | |
| My books are on display and easily accessible | |
| The pinboard in front of my desk reminds me of what I am aiming for! |
Tweak
On reflection, there is not enough space in the workshop for plants, I will however put more in the conservatory.
So far I have not had to make any changes to other areas of the design.
Reflections
What have I learned from this design?
GoBREDIM has been a really good framework for this project. It kept me focussed and on track by ensuring I set clear boundaries. I chose GoBredim over Obredimet as having a clear goal identified at the outset gave me focus for the design. Obredim by contrast would have been good if the room was more of a blank slate, and I did not have a clear idea in mind.
The project gave me additional yields; as well as a design that can be used towards my diploma, it got me back on track, enabling me to experiment with a number of tools.
I found PMI and colour coding useful to work out what to do with all the items I had to store. Adding ACTION in gave the activity greater impact.
Creating my own tool, Create/Conserve/Use/Remove was perfect in helping me sort through piles of clutter! It ensured that minimal waste was created as any items I no longer had use for could be re-homed.
I need to be more realistic about timeframes. Once the initial burst of energy had been used up, and the space was useable, I didn’t drive building the storage units forwards. I still intend to build them!